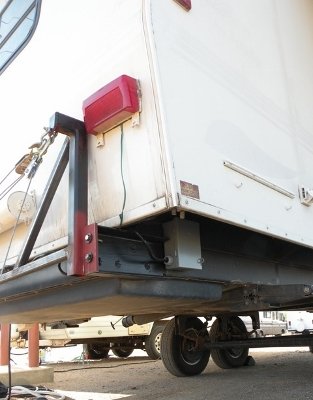
The Cowboy II an RV Motorcycle Lift for a Fifth Wheel
The first version of my "cowboy engineered" Motorcycle Lift was designed and built a couple years ago.
I drew up the idea... and had a local welding shop build 'er for me. It worked OK... but the lifting mechanism, a hi lift, handyman jack, was not the most reliable setup. On occasion, when I was letting the ramp down... it would come all the way down right quick! WHAM!
... and that, is just a mite, disconcerting! :-) ... and it gets more liver quivering the older I get.
So... I wandered back to the drawing board and sketched up some modifications. I don't know that I'm at the end of the rainbow yet... but I'm workin' my way closer!
My goal has been to build a Motorcycle Lift that's reliable, fairly simple, and light enough to work on a fifth wheel.
I don't know how a 'regular' rig would handle with a 500
lb bike hangin' back there... but I can say the handling of mine ('01
30' Jayco) didn't change a bit... The only difference I've seen is the
Jacobs exhaust brake on my Cummins doesn't hold back as well on the
heavy grades! :-) ...
That extra weight back there... of the Motorcycle Carrier and the Yamaha... is just enough to cause me to have to use the service brakes... ever' once in a while! :-)
Something that helps it work for me, I expect, is that I've got an almost equal amount of weight in batteries, for my solar power system, in the forward compartment. That balances out the weight real well and avoids the handling issues you might expect.
Also, the last time I weighed, I was still under maximum axle capacity.
That's for all the guys who'll say "you can't haul a bike like that, back there!"... I'm at something over 5,000 miles with Ol' Slick loaded in his RV Motorcyle Lift ... with nary a burp.
I do travel easy, which helps as well. You'll seldom find me bustin' 65 mph with the rig and bike on... Keepin' the speed down cuts down a goodly amount on the 'road concussion' the rig has to endure... Goin' slow has a lot of benefits! More than just saving fuel!
Now... back to the Motorcycle Lift rebuild.
The biggest part of the new design was to add a winch system; to eliminate the risky business of that danged Ol' Handyman Jack collapsin' on me. I'm also workin' to get it to where I can load and unload alone... without needing to have that Ol' Gal helpin'.
Allowin' her to be off playin', with her dogs or beads, rather than helpin' me load the bike, is a good way to avoid one more of the not uncommon, 'differences of opinion', that spring up every now an' again... in old married couples :-)
So... with that in mind, I went huntin' for likely winches to do the job...
There bein' a whole slew of 'em to pick from... that task didn't take but a short while.
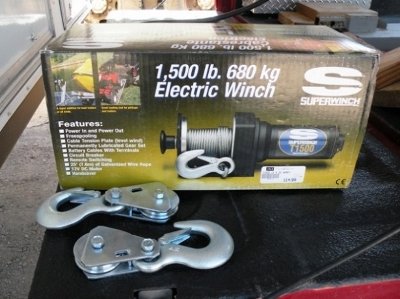
I found a light winch, built by Superwinch and rated at 1500 lbs that I figured would do the trick. Especially considering that my Yamaha V Star is just a touch over 500 lbs, and that I was planning on running the winch cable through a pulley system to make the final line load as little as possible.
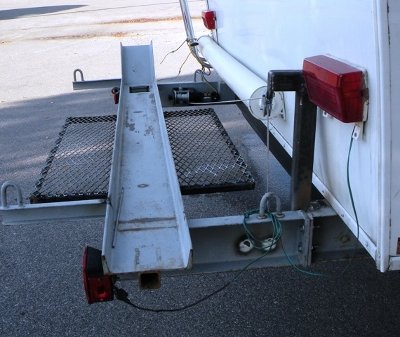
The second major part of the redesign was to add a locking wheel chock that would hold the bike, once it was rolled up onto the Motorcycle Carrier; to allow me the time to get the motorcycle strapped down securely.
I chose the superb Wheel Dock motorcycle wheel chock for this project. With just a touch of my foot on the locking lever, the gas cylinder presses the locking shoe against the tire and badda bing! Ol' Slick is held secure while I strap him into place.
Since the Wheel Dock got ordered late...OOPS! it wasn't here yet when I started the rebuild... so the work got done in two 'phases'.
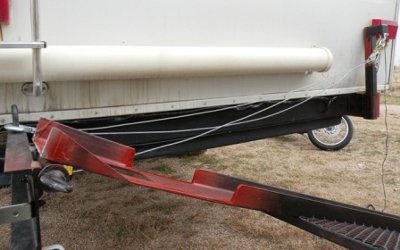
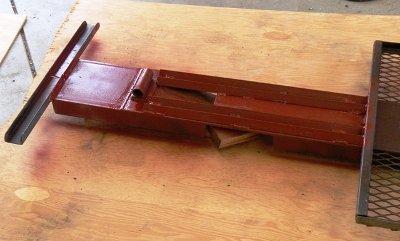
My Motorcycle Lift rebuild, 'Phase I', was the fabrication and installation of some footboards and the Pulley Tower I'll need to create the 'geometry' needed for the winch to raise the RV motorcycle lift. Also, the installation of the winch itself.
I got these 'pieces' of the job accomplished over a couple days... but I'll just describe it in 'chronological order'... in an attempt to keep it a little clearer... since I do have an affliction which tends to have me wanderin' off on unexpected tangents... every now and again!
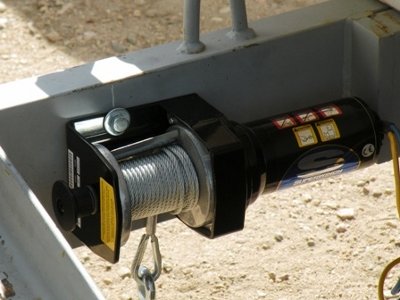
I'd thought that some sort of a 'shelf' would be needed to carry the Superwinch... but when we got to scopin' it out close... the only thing that made sense was to simply bolt the sucker directly to the frame extension, that carries the front wheel end of the Motorcycle Lift.
That was quick and easy!
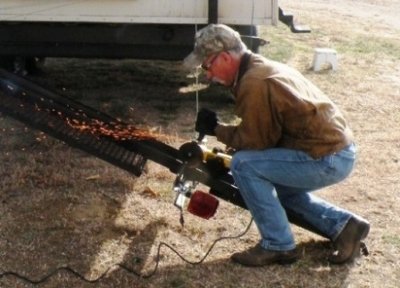
Next... Tom (The welder) moved on to fabricating and burning the Pulley Tower in place. I can weld... and as long as I've got a can of spray paint around... and plenty of Bondo... I can make those welds look real purty to!... but when it comes to things that are kinda 'Critical' ... I leave that welding to the pros!
I'm possessed of little desire, to look back on a dark night and see all sorts of sparks and flyin' pieces... all 'cause I wanted to think I was a welder! :-)

With the Pulley Tower installed, the next part, of this part, of the first part, of the Motorcycle Lift rebuild was putting together some foot boards... :-)
Now... this is one of those parts that I maybe hadn't worked all the kinks out of yet... I was thinkin' that I would be able to just 'ride' the bike right up the ramp into the Wheel Dock chock, and lock 'er in...
Nice thought... but unless I become some sort of a Motorcycle Stuntman in a rushin' hurry... that ain't gonna happen!
When I got the rig back home... and pulled the bike up to the end of the ramp... to see how it might work... I knew quick and for certain... it's too steep, too tight (with the trailer frame and such) and too spooky for my Ol' kiester... to ride up under power...
I realized... as quick as a mother-in-laws spite... without any delay or doubt... that I was gonna have to keep on pushin' it up... with the Boss Lady's help... or winch it up, slow an' easy...
So... anybody lookin' at this with the idea of comin' up with your own RV Motorcycle Lift setup... you might want to look at the footboards real close. Truth is... all you really need is some tie down points in the right places... though... if I succeed in finding a hand held remote for the winch... they'll be handy to have them where they are... I think! :-)
With those parts in place, it was time to haul the rig back home and wait for the Wheel Dock to show up so I could fit it into place.
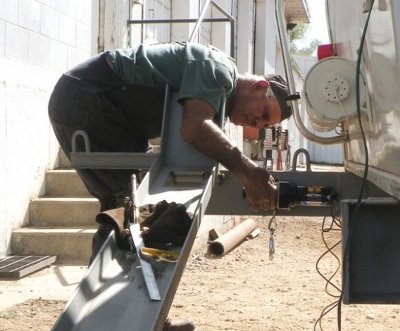
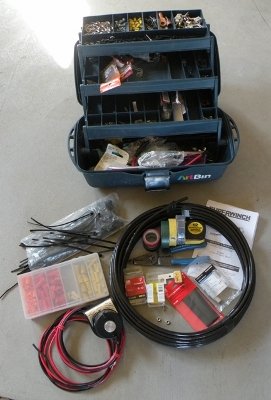
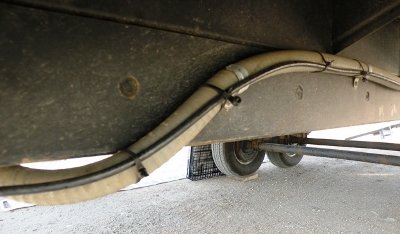
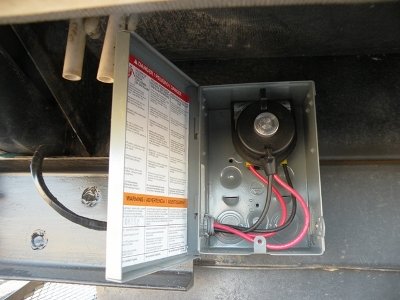
While I was waiting on that... I did the permanent wiring for the winch and a lil' testing...
The 'testing' revealed an un-expected lil' problem to deal with. I'd had Tom add another loop, for a 'lifting point' when he installed the foot boards and the Pulley Tower... and he put it right where I told him to...
only ... as stout as that 8" channel iron track might be... the position of that loop, at the inboard end of the frame extension ... gave it too much leverage... and it was twisting the track, a touch too much for my taste, when the winch started hoisting.
Also... I noticed, not much, but enough to be seen, ... that the Pulley Tower itself was 'torquing' a mite... when I engaged the winch...
So when I got to Phase II... I'd added a couple more lil' tasks to the job.
Bottom line, along with those two lil' tasks, the work for Phase II of my RV Motorcycle Carrier rebuild included:
- Do some major surgery and cut out the existing track to recieve the Wheel Dock wheel chock.
- shave a couple of the old tie down points.
- re-enforce the track... where it was notched to recieve the chock.
- Install cross bracing on the Pulley Tower.
- Install a new lifting attachment point to eliminate twist when lifting the loaded track.
- Get the Motorcycle Carrier properly painted!
So now... on to cutting off all the old stuff... in preparation for adding the new!
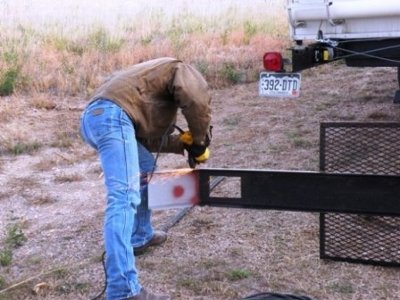
***Before Cutting off the 'Old' parts***
***After cutting off all the 'Old' parts***
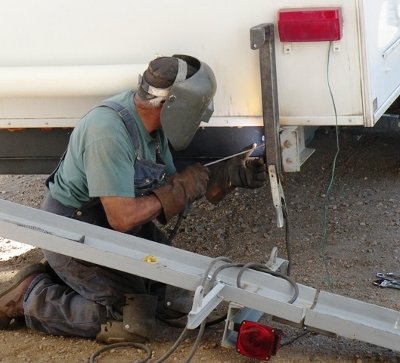
When it came time to do the second bit of welding... Tom... who built the Pulley Tower... had done run off to North Dakota!... so after stewin' for a day or two... I realized the husband of a friend of Heidi's is a pro welder... So, hat in hand, I went huntin' more welding help.
... and succeeded! Jaime rode to the rescue in his Chevy pickup... and one dark, rainy, and windy night... mostly on the floor of my shop, we got that bit of welding done in a couple of hours.
... which had the Motorcycle Lift ready to do the final finish work.
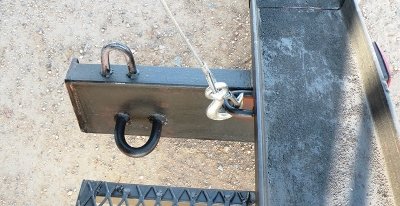
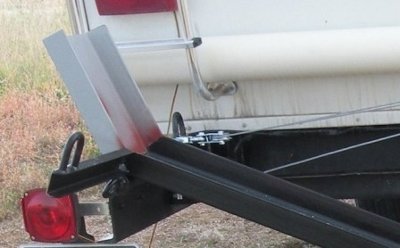
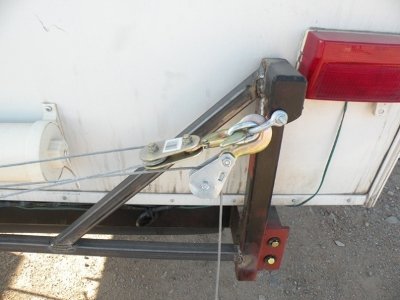
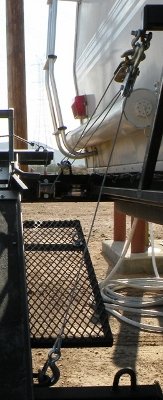
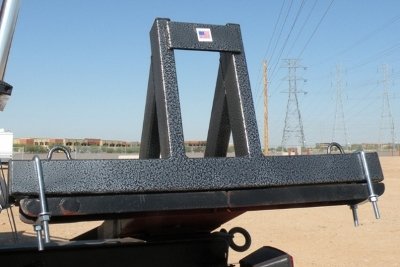
You can see the lifting point I had added first... the loop on the lower left... the final, working point is where the cable is hooked in on the right... The loop on the top left is a tie down point... to stop the motorcycle from sloppin' side to side.
I think I'll leave that non-functioning 'lift point' in place... it seems to be a better position for tie down... than that top mounted one...
***Cross Bracing to support the Pulley Tower***
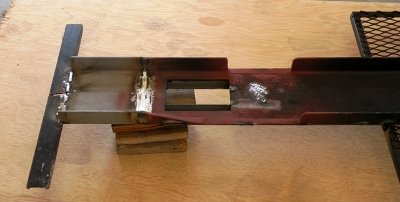
***Bars to Support the 'WheelDock' Motorcycle Wheel Chock***
***Angle Iron 'struts' to reinforce the track where it was notched to receive the 'WheelDock' Motorcycle Wheel Chock***
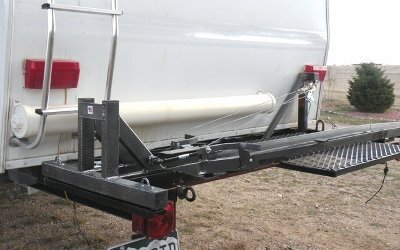
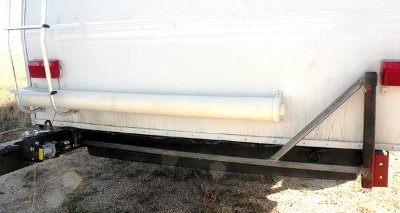
With all the welding done I finally got the Motorcycle Lift properly painted. It' been primer grey for something like two years! and then re-installed. As I was doin' that... It occurred to me, how to double up some pulleys to really cut the load on the winch... and the cable, by... according to the numbers, 50%.
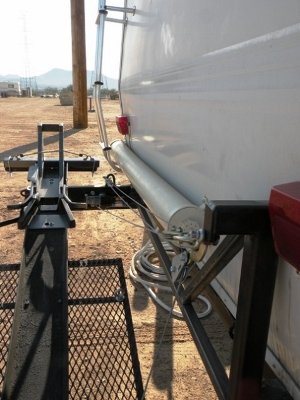
Though... it still interferes with the right side foot peg on the bike a bit... I have to tie that peg up when I load... and keep some pressure on the ramp of the Motorcycle Lift as I raise it... to clear those cables... (I've got a 'fix' simmering... and I'll add it here... if it works out!)
With everything back together, it was time to load the modified Motorcycle lift the first time... which took a couple tries to get it right... It took a few attempts for me to work out the right spot to strap the winch cable to the motorcycle.
If it was to high, as in the lower triple tree... the winch pulls the bike to the right too hard to keep it upright. If it's too far forward I ran out of cable about three inches too soon!
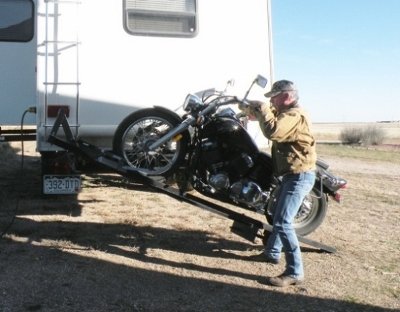
... finally, I found the point that was just right... the right, passenger foot peg. Hooked there, the cable was low enough, off set enough, and far enough back to avoid all those pesky 'issues'... :-)
After more than enough cursin', and gruntin'... and head scratchin'... the last time... with ever'thing finally hooked up in the right spot... that Yamaha rolled right up onto the Motorcycle Lift... pretty as you please, with me guiding the bike... and the Boss Lady twisting the winch control.
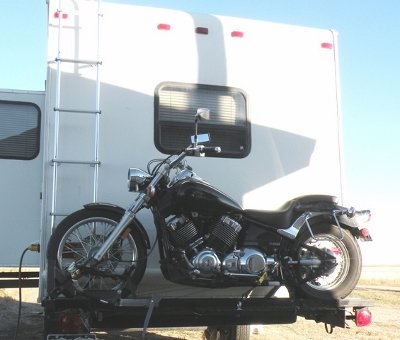
Then all I had to do was strap it in... winch it up (raise the Motorcycle Lift)... secure the bolts... and haul my 'Cowboy II' RV Motorcycle Carrier for a Fifth Wheel down the road!...
Which I did! That Motorcycle Lift rode 984 miles from Nunn, Colorado to Scottsdale, Arizona... over the rough and raggedy southern Colorado and northern New Mexico roads... the week after I got 'er finished. The only problem I had... was stayin' awake! :-)
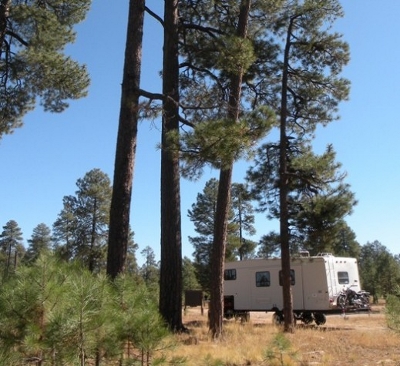
***A lunch break along the way... the Motorcycle carrier is hangin' on just fine!***
... Uh... except for another lil' thing I found... strappin' things down to the Motorcycle Lift... The Wheel Dock is designed to sit on and stabilize the bike on a trailer or garage floor... I'm usin' it in a lil' bit of a non-typical application. :-) ... I found a little bit of wobble... side to side ... but adding a couple U-Bolts to secure that front end to my Motorcycle Lift supports, took out that wiggle...
It ain't perfect... and it sure won't work on rigs that don't have enough frame to hang such a Motorcycle Lift from... or where the balance is all wrong... but it works for me!... The pin weight is within proper limits... and I'm still... just a touch underweight... if I sit on the truck seat reeeeaaaaalllll easy. With a handful of Helium Balloons! :-)
A lighter bike would be no issue at all... While Slick ain't a 'big' bike... sort of 'medium'... at 520 lbs or so... he ain't a lightweight neither!
So... what's the moral of the story?... If you want to carry your motorcycle with you... and you don't like the design... the weight... or the price of a commercially available RV Motorcycle Lift for a Fifth Wheel... Design and build your own!
And then... take your rig... your Motorcycle Lift... and your self... and go RV Boondocking... and Motorcycle Touring The Good Life!
Return from Motorcycle Lift to Motorcycle Touring the Good Life


